Tag Archive for: Company Tutorials

Did you know that you could use YAY-List to collect leads from your Party Host’s guest list?!  Or that you could add a special offer that will get sent to all of the party guests when your client sends their guests a thank you note?  What about using YAY-List to create “remarketing” ad campaigns on Facebook, Instagram, etc. 

Yup, it’s true!  

Wanna know how?  This one’s super easy, check it out…

STEP 1: Click on ‘Marketing Settings’ in the menu

Marketing Settings

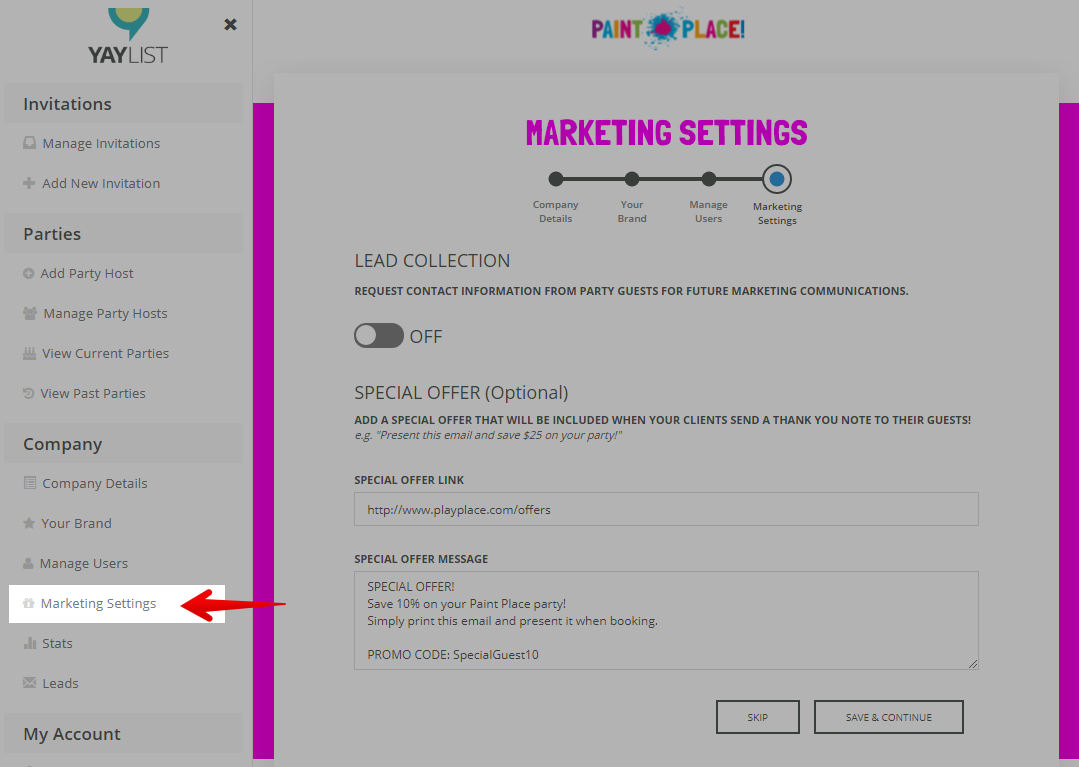
On the Marketing Settings page, there are two features you can customize:

  1. Lead Collection
    Collect leads and contact info from party guests as they reply with their status for a party they’ve been invited to
  2. Special Offer
    Include a special offer (with a link) on the Thank You note sent by the Party Host to their Guests

LEAD COLLECTION

STEP 1: Choose to turn your Lead Collection ON or OFF

STEP 2: Select your Lead Collection Type

  • Opt-Out: Party guests are added to your list by default, unless they opt-out
  • Opt-In: Party guests are neither opted in or out of your list by default and must choose their preference

note: consult your regional laws to be sure you are in compliance.

STEP 3: Customize your Lead Collection Question

Add a Yes/No question to ask Party Guests if you can contact them in the future with marketing messages.

That’s all for Lead Collection!  Be sure to click the SAVE & CONTINUE button to save your changes 🙂

BONUS STEP: View and Export Your Collected Leads

  • Click “Leads” in the sidebar menu
  • View your leads in the table
  • Click the “Export as CSV” button to download your full list at any time
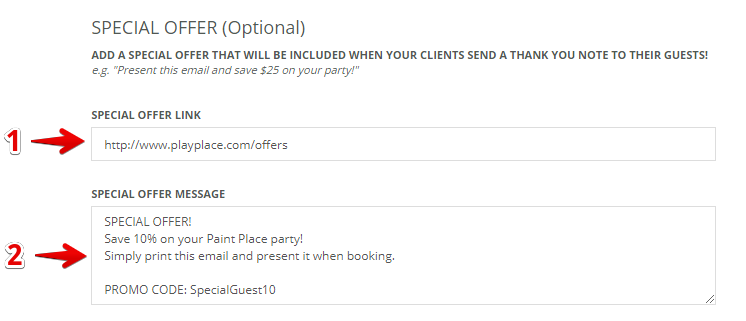
Collected Leads

SPECIAL OFFER

STEP 1: Add a link for your special offer

This can be a link to your main website, or if you want to get really fancy about things, you can create a page on your website specifically for people who get this offer and use that link!  (it must start with http:// or https://)

STEP 2: Add your special offer message

Examples include:

“Save $25 on a birthday party of your own!”
“Come visit us with a printed copy of this email and get free admission!”
“Thanks for partying with us! Have your party with us too and we’ll give you free lootbags! Use promo code ‘freeloot’!!! ”

STEP 3: Click ‘Save & Continue’ to save your changes

Special Offer

REMARKETING (a.k.a. Retargeting)

Ever wish you could target all of your clients party guests with those ads that seem to follow us around Facebook, Instagram, etc. anytime we look at a new product online?!

With YAY-List, you can! 🤯

When you link your Facebook (Meta) ads account with YAY-List, you can then target the people who are viewing your party invitations with your ads.
Think about it…
Your client’s party guests are most likely to be your PERFECT leads!
Why not dedicate your ad spend on these perfect leads.
Plus, this will help Facebook learn who your ideal clients are so that other ad campaigns you run can be even more optimized.
..
To set this up:
Scroll to the “Remarketing” section and add your Facebook Pixel ID

If you want to learn more about the Facebook (Meta) Pixel, here’s a beginners guide to Facebook Pixel from Hootsuite

And that’s all there is to it!

Dynamic Invitations

So, you want to make dynamic invitations that move?!

Good news, you can do that in YAY-List!!

First, be sure to check out the basics on how-to design your company invitations.

Ok, I know the basics, now how do I make my invitations move?!

Now that you’ve got the basics mastered, making an invitation that moves is simple.

All you need to do is be sure to use an Animated GIF as your “Invitation Image”.

Really, that’s all there is to it!

But, HOW can I get an Animated GIF if I don’t have one?!

If you don’t already have an Animated GIF, don’t panic.  As long as you have a video clip you’d like to turn into a GIF you’re all set.

There are a bunch of ways to create a GIF.

There are even some free online tools that can do it for you!

A simple google search will turn up a bunch.  One that I’ve used before is ezgif.com.

Simply go there, click “Video to GIF” in the menu at the top and follow their instructions.

Download your GIF and drag it into YAY-List as your “Invitation Image”.

Bada-boom, bada-bing!

Now, you’re moving 🙂

Party on!!

The Stats Dashboard is there so you can monitor your results.  The idea here is to give you the confidence that you are getting the exposure you are looking for, so you can stop wasting your time and money with marketing you can’t track (like print ads!)

All this said, if you don’t know what to look out for on your Stats Dashboard, it is useless!  So, here’s a rundown of the info you can find on your Stats Dashboard.

SECTION #1 (see image above)

Here you can change the date range for the stats you are reporting on.  Want to see how you performed in a specific month? No problem, set the start and end date for that month only.  Want to analyze your first quarter of the year? Piece of cake, set the dates!  Curious to see how much exposure you’ve received this year?  You guessed, easy as pie, just set those dates and click “Get Analytics”.


SECTION #2 (see image above)

There are a few key metrics reported on in this section.  Going from left to right, they are:

Published Themes: This gives you the total number of invitation designs you currently have

Emails Sent: How many emails were sent out with your brand (and for one of your clients events)

Party Hosts: How many active party hosts you have

Page Views: How many page views your invitations have received


SECTION #3 (see image above)

This chart will map out for you how many emails have been sent AND how many email views your brand has over the last several months.


Well that just about covers it!


As the old saying goes many hands make light work, so why not invite other members of your team to help you manage your YAY-List account.  It’s simple to do and you’ll be able to control what they can or can’t do within your account!

So here’s how to do it…

STEP 1: Click on ‘Manage Users’ in the menu

STEP 2: Enter the user’s email address and choose their access rights

Designers = Can only create/manage invitations
Managers = Can access everything except: Billing, Manage users and Upgrade features
Full Access = Yup, you guessed it!  They can do as much as you can!!

STEP 3: Click the ‘Add User’ button

STEP 4: Kick back and relax

Now that you’ve invited them, all they have to do is click a link that gets emailed their way, create a password and they’re all set up as a user for your company’s account.  So, kick your feet up and take some much needed “me time”, while your team helps you spread your name all over town with your beautifully-designed, fully-branded electronic invitations!


There are two important steps to take when setting up your company account.

STEP 1: ENTERING YOUR COMPANY DETAILS

Here’s a short video on how to do that.

STEP 2: ADDING YOUR LOGO, COLORS AND FONTS

This is the fun step! Here’s a quick video on how it’s done.

The next two steps are covered in other tutorials.  You are welcome to check them out here:

How-to Add/Manage Company Users

How-to Add/Manage Special Offers

Of course, you can contact us with any questions at all!

This video will walk you through the steps you need to take to set up your company invitations.  While the video is over 7 minutes long, don’t be scared, you can actually get it done in 1 minute or less!  I just wanted to make sure to show you all of  the options available 😉

If you don’t invite any clients to use your invitations, then what are you using YAY-List for?  The good news is that giving your clients is REALLY EASY!  Here we go…

There are TWO methods to give your clients access to your branded invitations:

METHOD 1:  Share your unique ‘Add Party Host Link’

METHOD 2:  Add and pre-register your party hosts

METHOD 1: How-to share your unique ‘Add Party Host Link’

STEP 1: Click on ‘Manage Party Hosts’ in the menu

STEP 2: Click on the ‘ADD PARTY HOST’ button

STEP 3:  Copy your unique ‘Add Party Host Link’, found at the bottom of the page, and share it with your clients

Add Party Host Link

METHOD 2: How-to add and pre-register your party hosts

The advantage of this method is that you’ll pre-register your clients, making it a touch easier for them to get started.  Plus we’ll send an email their way on your behalf telling them all the exciting reasons they should use YOUR invitations for their party!

STEP 1: Click on ‘Manage Party Hosts’ in the menu  (same as in Method 1 above)

STEP 2: Click on the ‘ADD PARTY HOST’ button   (same as in Method 1 above)

STEP 3:  Fill in the necessary info and click the ‘SEND & CONTINUE’ button

Add Party Hosts

And that’s all there is to it.  Party on!